16 December 2014

Snow Moves in on JR

As promised, no more flurry of effort being put in to the house for awhile, but I still have some updates to share. Also, I apologize in advance that some of the pictures are pretty crappy. I don't have any mechanical outdoor lighting, and it's usually dark by the time I remember to take pictures, so it's all up to my phone's tiny flash to show anything at all.


This is the North wall of the house, where siding is catching up with the South and West walls. Still plenty to do, but it's coming along nicely.


Two things going on in this shot. First, snow! Lots of snow, actually...although it looks deceiving, especially at the rear of the trailer (where the ground is several feet away from the underside of the house), the snow is over a foot deep at the time of this photo.
The other thing of note is Alexi (our car, in case you're not familiar) in the background, stuck in the snow. Poor guy needs some new tires with better treads, so over an hour of the day here was spent digging and pushing Alexi back onto pavement. I do appreciate the help of the neighbors and a good samaritan who stopped to offer help, and a bag of salt for traction.


After getting over being startled several times by a loud "wumpfh" sound, I figured out that the snow was sliding off the metal roof and slamming into the ground in big sections. Big parts at a time because, as you can see, the snow would slide down and somehow have enough integrity to stay attached to the rest of the snow up on the roof until it was cantilevered out a couple of feet. Cool! (though it suggests it may be prudent to buy some snow guards for our roof to reduce the chances of one of those big sections hitting someone in the head)


Early winter in Rochester means snow piles up, then melts. Piles up, then melts. This is not great for the "utility shed" at the front of the trailer, which still didn't have a finished roof. So, I finally got around to starting that.


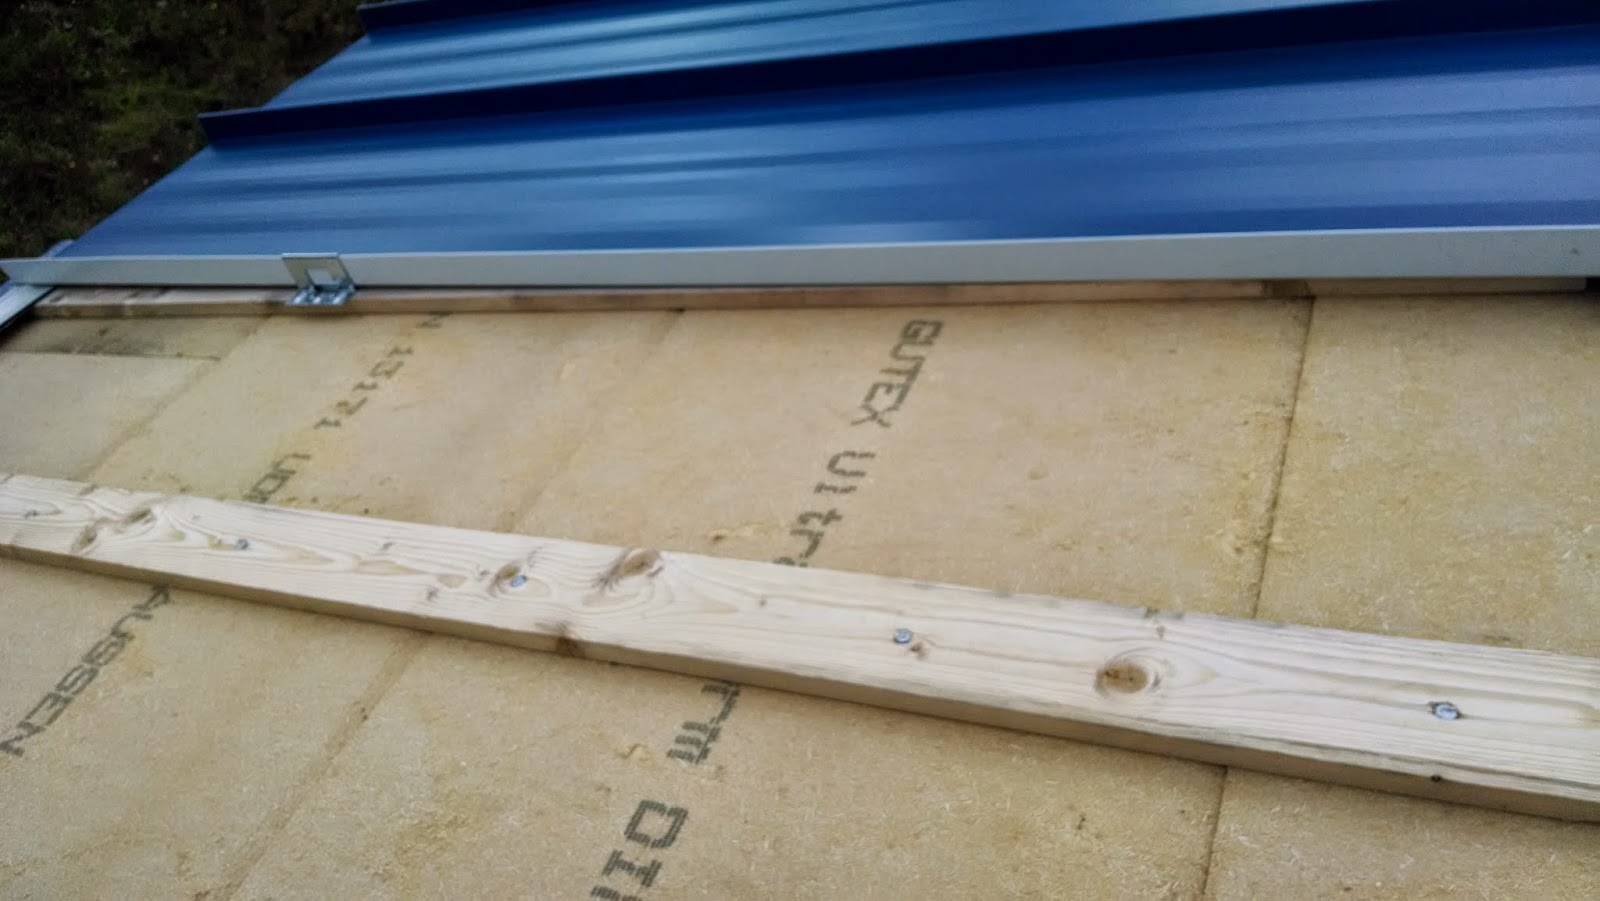
And here we are with the most up-to-date progress: the mini-roof is complete except for rake and pitch break trim.


03 December 2014

Exterior Nearing Completion


First, a fun picture! It turns out some of the drinks we were storing didn't much agree with the below-freezing temperatures. Oops.


We've also made progress on siding. Here's the South wall...


...and here's the West wall.


The North wall was feeling a bit neglected, still being at the Tyvek stage. So, we started to catch that up. First, Roxul.


And then some battens and trim going up.


And with the Roxul going up on the North, we were close to done with that step.


And then, finally, checked one more thing off the list.


Last, we also started on the soffit, the last bit of the exterior we hadn't started at all.


We'll keep working through the winter, but, to be honest, I've been feeling a bit burnt out on the project lately. We started in July, making us about 5 months in to the project. From the beginning, we expected it to take us at least a year, as there was plenty we'd have to learn how to do along the way. But I suppose that just as with any project, the middle is the hard part to get through. At the beginning, there's bushy-tailed eagerness. At the end, there's the impending sense of accomplishment, the light at the end of the tunnel, or perhaps even the panic of an approaching deadline. In the middle though, well.

So, we've been working the weekends, but otherwise trying to relax a little. Stay inside with tons of blankets, hot tea, and the like. I'll keep working, and of course keep updating. So, stay tuned for the completion of the exterior, which will be followed by the rough utilities, then insulation, walls, and many more fun projects!

16 November 2014

Progress Update: Roof Complete; Lofts, Trim, and Siding Started


Pretty hard to see in this picture, but that's a very large V of birds migrating South for the winter. We can't follow suit, so now it's getting really quite cold to work outside, and also getting dark really early (by about 5 o'clock, we need head lamps to work).


Doing the rake trim here...in the miserably cold, dangerously slippery rain.


And this is what working on the roof looks like at about 5:30pm (that is, pitch black without the camera flash).


Some of the final trim pieces are rather complicated, but when everything is cut, taped, screwed, riveted, folded, and hammered in just the right order, the end result is a (relatively) clean look...and most importantly, has no fasteners penetrating directly through the panels into the underlayment.


Here's one of the final pieces of the roof: the Z-Closures. Sadly the tape is not color-matched so it stands out a bit, but we may try and paint those little bits of white to match in the spring (when it's actually within the correct temperature range for paint to dry again). A day more of work after this photo was taken, we finished the trim, so the roof is officially done now.


On to other projects! This is the very first piece of interior work on the house: a loft joist. We opted for 1.5 inch square tube steel rather than 2x4s laid on edge, because these give us two extra inches of head room but are just as strong (at least).


Looking through my photos I realize there are several shots I should have taken but forgot. So, I don't have a good picture of the lofts: they now have almost all the tube steel up. So, we'll just have to continue on to this: finishing battens on the South wall. And if you look closely, you can see the window on the right has trim in place now.


Here's a closeup of the window trim. We decided to go with only 3/4 inch trim around the windows and door, partly because laying trim on end like this allows us to cover up the extra width of rigid insulation that sticks out past the edge of the window itself (this only became an issue because the windows are flashed to the Tyvek which is behind the insulation).


This is a closeup of the bottom edge of the battens. We tucked fiberglass insect screen behind the battens...


...then folded and stapled it around the batten end as shown. This creates a barrier preventing insects/birds/other critters from crawling up into the rainscreen gap behind the siding.


With battens, trim, and insect screen in place, we put up the very first piece of siding!


And despite the cold, several friends came to help put up siding on Saturday (and one on Sunday, too!) Thanks, everyone!


Progress on the southeast corner.


And here's the state of the South wall about mid-day Sunday.

Sadly, there are again photos missing of other progress that happened this weekend. The siding now extends up to the underside of the windows on the South wall (all the way across), and while some people were working on that, others hung the insulation and battens on the entire West wall, and made some serious progress on the North wall as well! There's still plenty more to do, as always, but I think we're on track to finish the exterior in a few more weekends, provided we can muster the motivation to work in the dark, sub-freezing weather some more :)

28 October 2014

Roof Nearly Done!


In order to expedite getting the siding stained (first coat on all six sides), it required a much larger drying space than setting a few boards on the steps of our A-frame ladders.


And, after less time than it would have taken to keep hand painting even half the remaining boards, our boards arrived, ready to head over to the build site. Also pictured here (shoved into the right side of the truck bed) are the steel tubes that we'll be using instead of wood for our loft joists.


But despite the progress on getting siding painted, the real push recently has been trying to get the roof done before the first snow. Here goes the first main panel!


It looks pretty good from the ground, minus that little bit of fascia that still needs to be painted :)


View from the roof with our help "hemming" the next panel to prepare it for installation.


After a few panels, we started to get the hang of things...


...even though occasionally our battens were hilariously off of square (see how the batten starts off right where it should be at the eave, then retreats below the panel within a few feet).


And then there were the ladybugs. So. Many. Ladybugs. They didn't really impede progress, but it was a bit bothersome to have them fly into your face while standing more than 10 feet in the air on a ladder or the roof.


There were probably hundreds of the little bugs, and they loved all the tiny little nooks and dark spaces, like here between two studs where a family of them decided to camp out.


Still, we continued to make progress, getting about halfway by Monday.


As we approached the end, I had to stand on the panels directly, though I tried to keep my weight over the battens since standing in the middle of a panel would flex (though hopefully not permanently bend) it by the height of the battens (3/4 of an inch).


And then, the last main panel was on.


From the ground, it looks pretty good. Now, all we need to do is put in rake wall and peak trim, and the roof will be complete. This was Tuesday afternoon, and within minutes of that last panel going up, it started to rain, stopping our progress. On the bright side though, we got to hear the sound of rain on our metal roof from inside: something we've both been looking forward to (and it didn't disappoint!)


19 October 2014

Build Days 30-31: The Roof Arrives! (But Progress Slows)


So, bad news first: something (wind, I guess?) pushed the entire tiny house off the jack stands it was up on. That means the whole thing fell, probably quite suddenly (we weren't there at the time), more than a foot and a half to the ground. Three of the jack stands fell on their side, but one remained standing, and punched through the floor, as shown (this used to be a nice, smooth sheet of aluminium). Fortunately, the rocks we set behind the wheels apparently stopped the whole thing from rolling away!


Everything inside was a mess and had fallen all over the place. This picture, which captures some of the mess, is actually after a good bit of cleanup.


This is one of the culprit jack stands that apparently failed.


And here is our replacement solution: piers built out of cinder blocks (and concrete paving stones for the slightly finer height adjustment) under each corner. It seems unlikely that these could tip over the way the jack stands did.


The good news, now, is that our roof finally arrived (six weeks after ordering it, despite the original quote of one week lead time). We opted to bring it out with a rented home depot truck, which was cheaper than the last mile delivery fee from the supplier, and also let us get started right away.


The gray strip here is the "cleat", the first piece of the roof. The "eave trim" piece hooks over the cleat.


And here is the eave trim up in place over the cleat. This piece was probably one of the most challenging pieces to attach so far: it took three hours of trying and trying again. I think we attached the cleat a bit too high, which made everything slightly out of alignment. As we proceed (and for anyone else doing one of these hidden fastener roofs), a better way to ensure alignment is probably to slide the trim piece over the cleat while on the ground, then lift them both as a unit into the correct position, mark where that puts the cleat, take it all down and separate the two pieces, and finally attach them one at a time as we did above. Except that carefully marking the cleat position this way should hopefully make everything align exactly right. Since we have to perform a nearly identical process on the rake walls and peak, hopefully the experience we've gained will make the work on those sides faster and less frustrating!

12 October 2014

Build Days 27 to 29: More Exterior Progress


More painting of the siding. This was starting to feel like this task would take forever, but now we have 20 or so boards done, and the rest shipped off to family with a paint sprayer and a promise to paint them for us. We really appreciate it!


Much of the inside of the house has turned into drying space for the siding. And storage for tools, and materials. Actually, it's a little scary how little space is left with some stuff stored inside!


More progress one the utility box.


It's now up to pretty much the same level of completion as the rest of the house.


This didn't come out as clearly as I hoped, but what you're supposed to see here is tons of condensation on the windows (and the fascia, and everything, really). That's how the house is every morning now, as it's falling below freezing at night now. I really wish the roof-with-1-week-lead-time-that's-now-on-week-six we ordered would arrive. The overarching goal for timeline on the house was exterior completion before the first snowfall, and if we don't get that roof on soon, I'm not sure we will make it.


This weekend, we started on the Roxul rigid board insulation on the exterior. It adds an additional R8 to the wall assembly, and provides some cover for the thermal path of least resistance/thermal bridge of the wall studs. I have no doubt we'll appreciate the extra insulation when living in JR House during Rochester winters.


Very like the Gutex on the roof, the Roxul gets sandwiched with battens, though in vertical configuration on a wall, they're called "furring".


Since those furring strips are secured through four layers and nearly as many inches to reach the studs (thank you German manufacturers for making massive screws not readily available in the US), it's pretty important, but not easy, to ensure those screws hit dead on the center of each stud. This picture shows how we used a level to ensure the furring board stays directly over the stud down its whole length.


The Roxul actually went up pretty quick: we got the entire south wall done this weekend.


And just at the end of the day on Sunday, we started Roxul on the east wall and figured out exactly where we wanted to place the furring strips to provide a good nailing surface to both the corner trim and the siding.